Sunday, November 24, 2013

Key to my heart

I had a key hanger that had a cross stitch "Home is where the Army sends you" in a frame. Well it has been a long time since the Army sent me anywhere so I thought it time to update it. (I wasn't in the army; my husband was). Here is a picture of the frame/hanger - a bit blurry but you get the idea.

My heart is in need of some new keys so I made this picture. If I ever get time to cross stitching I may make something more permanent but I like the results for this. Here is a close up of Tilda and her keys.
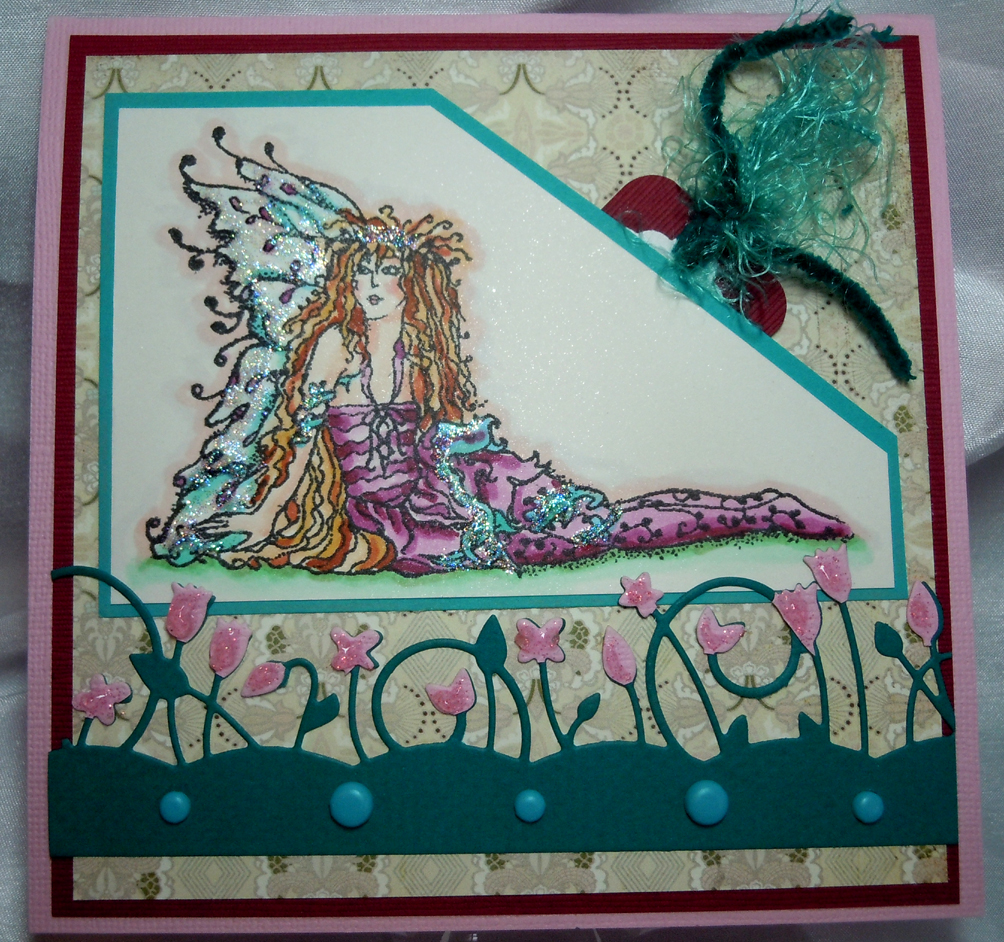
All is colored with copics. The lace at the bottom of the dress has frosted lace stickles. Added dome flowers and sparkly candy dots in each corner. The keys a die cut from poppy stamps. The bow is some fiber from a basic grey collection. 
Hope you enjoy.

Thursday, November 14, 2013

Cards, Cards, Cards

That title is for 3 cards. I actually made three cards. I haven't sold the house but I have moved to a small 2 bedroom apartment that I love. It was a difficult move but I'm glad I did it. Maybe later I will share some photos of the new place but for now I have cards to share and that is what this blog is about. The first two cards are for a couple of special ladies who helped me with the move. Both are Tilda's colored with copics.
 The flags on this one were made with washi tape.
 This is a Christmas card I made. The angel was embossed. Embossing is what got me into stamping but I rarely do it now because I am like a little kid - I love to color. The red dots are nailhead stickers.
Hope you enjoyed my creations as much as I did making them. It is so good to start creating again. There is still a bit to do in the apartment but it is definitely liveable.

Sunday, August 25, 2013

Grape Tilda

I have been missing in action as I am going through my house trying to get it ready to sell and to move or move and then sell or something like that. It is so much work as I have been here for 20 years. Besides my four kids, a husband, my mother and mother-in-law have lived with us so there is much to clean out and there is only me. Someone want to help? Help! LOL My kids have helped some but they aren't here all the time. (thought I had better give create where it is due.)
Anyways I took time to create this evening.
I made Tilda with grapes. I think she is supposed to be holding a basket of cherries or maybe blueberries but I had that bunch of grapes sitting on my table and the stamp and thought why not grapes. The grapes were part of a set of pins to wear on clothes but I haven't used it so I took it for a card. Recycle - Upcycle - Reuse. Tilda is colored with copics. My youngest has hair just about this color. The die behind Tilda is from Sizzix. I took one of the smaller ones and cut two turning them on their sides and tried to make it look like one. :) Did a little bit of stitching around the edges. Added some flowers and the bunch of grapes. I tried to use scraps as I have so many and I don't want to move or pack anymore than I have to. Hope you enjoy. Maybe in a month or so I can get back to regular crafting. I know I have one card I have to do for September 4th. A birthday blog hop so hope you can come back then.

Sunday, July 14, 2013

House Mouse Puzzle

My oldest daughter turns 30 on Wednesday. I don't know how that could be as I am only 25. But there it is. She has always loved house mouse stamps and puzzles. I never got any house mouse stamps but have recently started collecting them. I just got a bunch on ebay. This is one of them.


The puzzle is paper pieced. Lots of fun cutting out all the little pieces. The dp is from a 6 x 6 pad from Basic Grey. The mice are colored with prisma color pencils. The rest is colored with copic markers. There are touches of stardust glitter on the puzzle and on the box top. In the upper left hand corner are gold nailhead stickers. In the upper right hand corner is a puzzle piece tied with ribbon and a flower on top with another nailhead sticker in the center. In the lower left hand corner is a flower with a puzzle piece in the center, 
Here is a picture of the inside.

This is a picture of Emily and her then fiance now husband.

Friday, July 5, 2013

Christening Gown

This post is definitely not about stamping but I had to share the christening gown I made for my granddaughter. I saw this pattern in Sew Beautiful just at the time when it was time or maybe past time to start to make it. I knew it was just right. Not as frilly and long as some so it was more in my price range and time range. As it is it won't take long til she outgrows it. 

The fabric is Victorian batiste. I did all the lace insertions by machine but had to sew the laces together at the top by hand as I couldn't keep them from separating when trying to sew them together by machine. Here is a close up of the top.
 I haven't put the buttons and buttonholes is yet as when I got it done I thought the neck looked a little small so I will have to check it out and maybe take the binding and lace off and lower the neckline and then put it all back on. Sure hope not.
Here is a picture of the bottom with the embroidery I did. I almost didn't put it on but am glad I did. I think it adds a lot. 
Wish I would have kept track of the hours I spent on it just for fun but I didn't. It took me a month or more to do it but that wasn't steady work.
Here is a picture of Avani and her mother, my daughter. The picture is a few months old. 
Found a more recent one - most of my pictures are on my phone so had to figure out how to get it here.
Hope you enjoyed. And maybe inspired you.

Tuesday, June 25, 2013

Wonder and Joy Flags

I promised a second post for tonight so here it is.
I used Wonder and Joy from Red Rubber Designs for this card.
The girl is colored with copic markers and once again all the patterns use washi tape. The flags are made by folding the tape over the twine or the tooth pick and then cutting notches so they look like flags. It is really easy but adds so much fun. Notice that there are two different widths of washi tape used.

Washi Rose

I almost never make a card where I don't color but today I did it! There is no patterned paper either - just washi tape. That stuff is so much fun. Lots of pretty colors, less expensive than ribbon and not as sticky as regular tape so it is very forgiving when you make a mistake. I never make mistakes (blushing at my lying :)).

The flower is done with washi tape as well. You just haphazardly fold it in half and then wind it around itself and stick it on a one inch glue dot. I put a blue rhinestone in the middle. The saying is from April Showers by Penny Black. Look out I may get another washi tape card done tonight.
We did a card very similar to this at my stamping class at Stamp Fanci last night. I told my son I was taking classes there and he was surprised because he thought I should be teaching. There is always something new to learn. 
I am entering this over at That Craft Place http://thatcraftplaceblog.blogspot.dk/ for flowers

Tuesday, June 11, 2013

Pick up

When I was making this card I kept picking up stuff off my desk and using them. That is not to say you can really find my desk yet but it is slightly better, very slightly. :)


My niece graduated from high school this year. The colors are red and gold. I love that combination, maybe because I went to the same high school. 
Tilda is colored with copics with a few highlights with a white pen. The tassel is yellow stickles and the shoes have diamond glaze on them. The words and the tiny flowers around the image are from some old angel company stamp sets. The die cuts are from memory box. The pearl sprays, rose felt flower and lace are what were laying about. The flower is felt done with a memory box die. There are stickles on the petals. The papers are from lots of different companies. 
I am entering this in a challenge to use lace over at magnolia-licious 

Hope you enjoy.

Saturday, June 8, 2013

I wll always love you more

That's what the words say that you can't read too well because of the flower stems. I think I will send this  card to one of my daughters. I think as parents we love our children more than they love us. We invest so much time to make them responsible adults and then they fly away to make their own lives.
This card is a little different from my style lately but it was fun to do. Don't want to get into a rut. I took a class at my local stamp store and we played with distress inks, stains and paints so this is a take off from that. I sprayed the specialty paper with water and stamped the distress inks onto a craft sheet and spread it around. I stamped some numbers with the distress ink and put it in the corners and then quickly rubbed a little off so it wasn't so pronounced. Then using an embossing ink I stamped the little sunshines around. The flower is from Stampers Anonymous. It is colored with Adirondack markers with some white ink and then stickles. The butterflies are from a Martha Stewart punch with Queen & Co. gray pearls. The red dots are nailhead stickers. The dp is from basic grey. 
I am entering this in any thing goes over at Flutterby Wednesdays. http://flutterbywednesdays.blogspot.com/
Hope you enjoy.

Friday, June 7, 2013

Mary and Marty

A couple renewed their vows after 35 years of marriage. Isn't that wonderful. I love to hear people staying together. I love to see older couples being affectionate with one another. Love is staying together through thick and thin. Not to say there is never a reason to split but it is fabulous when a man and a woman can make it together.

This is the cover I made for their vow renewal.

The hear stamp is one of the first I ever got. It was so hard to get it to stamp right. I finally took it off the wood blog and used a acrylic block. That helped but I still had to do a few tries to get it right. The original colors of the wedding was a pastel rainbow so I chose lots of different colors to make the cover. The flower is from Magnolia. The dies are from Memory box. The flowers are colored with copics. Some stickles are pearls are added through the heart. Mary and Marty were done on the computer. 
Hope the couple enjoyed it and have 35 more years together.

Graduation

It is that time to make graduation cards. I made a couple and have several more to go.


Pretty simple. I chose the colors because those are the colors of the school the boy was graduating from. The image is Edwin from Magnolia. He looks so hopeful and yet a bit apprehensive. Isn't that the way we feel when we graduate. Edwin is colored with copics and a bit of white pen for highlights. The "Congratulations" is from an old set from the angel company which is now gone. :(
The ribbon is tied around a swirly clip with a star charm tie to it.
Here is the inside.
Added a couple of punched mortar boards. The sentiment is typed from the computer. 

Here is another graduation card.

The words are stamped with chalk ink. The star dp is from basic grey. Tied with an organza ribbon.
Hope you enjoy.

Wednesday, May 22, 2013

Daisy Tilda

I have really been a stamping kick lately. That's a good thing except for I am not getting my housework done or my lawn mowed. Do you know anyone who works for cheap - real cheap? :)
Anyway here is my card.
 Tilda was colored with copics with some white pen highlights. The background is done with a technique I haven't use in years but I think it is pretty cool. It is done with a Kalidicolor ink pad and a brayer. Ink up the brayer making then keep the yellow end in the center and keep rolling around in a half circle. There will be corners that are blank so ink up the blue part again and roll the corners. (Is this clear as mud?) The clouds are stamps from Penny Black. First I did them with some puffy paint but didn't really like them so I added some stickles but that didn't do the trick either. I was rooting around in my drawers and came across some fun flock and that was just right. The fence is done with a Martha Stewart punch as is the butterfly and the scallops on the bottom. The yellow paper is some I have had for 10 years I bet. You just never know when you will need something. I tied baker's twine around the yellow and then added flowers with yellow stickles for centers. Mini pearls are on the butterfly and the centers of the punched border.
Here is the inside. The little flower in the corner is done by cutting two half flowers from the border punch and putting them together with a small pearl in the center.
I stayed up way too late last night finishing this card. It just wouldn't let me alone until I finished it. I'll pay for it today by being tired. :)
I am entering this in weather challenge at Magnolia-licious http://magnolia-liciouschallengeblog.blogspot.com/2013/05/tuesday-challenge-ways-2-weather-it.html

Sunday, May 19, 2013

HB 2U

Of course this is a Happy Birthday card. I used a Magnolia image from last year's Christmas collection that I hadn't used yet. I see several I haven't used. I will have to do something about that. :)
This little teddy is colored with copic markers. The ruffles on the apron has frosted lace stickles on it. I did the letters by hand. The strips down the sides are washi tape.
Now for the inside.
A series of pop-ups for presents that have washi tape on them for the wrapping paper. The bows are done with some twine from the Spot One section at Target. The little girl is a mini Tilda colored with copics. The happy birthday stamp is an one from the former angel company.
Here is a close-up.
I almost ruined the image. I took off the cap from E50 to put some highlights in her hair and it leaked. Fortunately it was a light color and was easily fixed. 
I got the idea for this pop-up from http://denami.blogspot.com/2013/05/washi-tape-pop-up-card-tutorial-by-dana.html. They wanted $6.00 for the pattern. Well, I am too cheap for that so I figured it out myself. If I were to do it again I make the pop-ups match the width of the washi tape. I added a little copic marker on the edges if they didn't match just right.

Hope you enjoyed. 

Sunday, May 12, 2013

Wading Tilda

Have you ever made an upside down card. That is what I did here. I picked the card up to take its picture and realized it was opening upside down. Oops! Well see what I did to correct my mistake.

Yep! I made an easel card. 
Here is a close-up of just the front.
The Tilda is colored with copics. There is crystal stickles in the water and the butterflies. The lace has frosted lace stickles. There is yellow stickles in the center of the flowers. The pleated frame is done with washi tape and the yellow across the card is another color of washi tape. The butterflies are from a Martha Stewart punch. The green is DCWV card stock with a dotted embossing folder and then sanded so the white core shows through. The dp is from K & Company. Some pink half dew drops are in the corner and the flower on the inside. You cans see the yellow washi tape better on the inside. 
Hope you enjoyed! I love reading your comments if you care to leave them.

Wedding Swans

My daughter is going to a wedding next weekend and I volunteered to make her a card and this is what I came up with.

The image is from Red Rubber Designs here. I have always loved these swans and somehow they make me think of weddings. The image is colored with copics, a blue glitter pen and some stickles. The pleats around the edge are done with washi tape. You can find the instructions can be found here. The layout is loosely based on the layout from Stamper's Quest here. They always have the most interesting layouts if you are looking for a challenge. The background dp is from memory box. The labels are also a die from memory box. I had wrote the words in. The flowers have yellow stickles in the centers. There are half pearls in the corners. 
Have a great day.

Wednesday, May 8, 2013

Rainy Days and Mondays

Well actually it is Wednesday but oh well. Saturated Canary stamps are so much fun.  You can get them as digis or as rubber. The one I am using here is a digi.

Isn't she just adorable. You can purchase her here. She is colored with copics. I had so much trouble getting the background how I wanted it. Still not totally satisfied but ok. There are stickles on her dress and hair band. The boots have diamond glaze because rain boots are shiny. :) The designs on the pink are washi tapes from Queen & Co. The scalloped rectangles are from nestabilities. The swirls are from memory box. The butterfly is a punch from Martha Stewart. The pink flower is colored with copics as well. I stitched around all the different layers with yellow thread.  Some half pearls complete the look. 
Here is the inside where you can see the two different washi tapes better.
The yellow and pink is paper cut off from the paper on the front. Hope you like my Rainy Days card.

Monday, May 6, 2013

Fairy

This fairy is out of my normal range but I won her a few years ago and as my dd loves fairies I thought I would use her for dd's birthday card. I usually only do cute fairies...It is hard to believe my youngest will be 21 in a couple of days.

She is colored with copics with stickles applied to the wings and halo and swirls. The flowers at the bottom are a die from memory box I think. I cut it out in the dark aqua and then in the pink. I cut off the pink flowers and glued them over the aqua and then applied a glitter glue I got at Target's One Spot section. There are two sizes of brads in the "grass".
Here is the tag.
I stamped "love" in a green and then in an aqua. I tied some fibers that I had sitting around.
The fairy stamp is from Elemental Doodles but I think they went our of business a long time ago.

Sunday, May 5, 2013

Celebrating Elephant

I love elephants so when I saw this I had to get it.I really have to blame Suzanne of http://scrapbitz.blogspot.com/ because she was the one who pointed out this company out to me. The elephant is made by wild rose studio.

Isn't she just the cutest thing! This little nellie is colored with copics. The balloons have diamond glaze applied to make them pop out a bit. Most of the flowers are some I got at Michael's and have stickles for centers.  The twine is from the One Spot section at Target. The swirls are sections of a die from Memory Box. The little glittery squares in the corners are from pez-a-doodle (no longer in business). Hope you like this card as much as I do.

Tuesday, April 30, 2013

Peony

I got this stamp quite a while ago but had never used it. I love peonies. I may have to buy a plant and put it in my yard.


The stamp is from Red Rubber Designs. The image is colored with copic markers with yellow and stardust stickles. I cut the image into three panels and mounted them onto navy  panels. The last panel is tied with fibers from Basic Grey. There are glitter candy dots down the one side. The butterfly is punched from a Martha Stewart punch. The designer paper is from a basic grey set and mounted onto more navy card stock and put on a pink Bazzil textured card measuring 4 1/4" x 6". A slightly odd size but it was what worked. Hope you enjoy.

Monday, April 1, 2013

Green House Mouse

Here is a card I did for a green house mouse swap. The coloring is done with copics. Some stickles are added to the gumdrop. The copper dots are nailhead stickers. Pretty simple. 

Friday, March 22, 2013

Giraffes

 
This card was made for my other son-in-law who likes giraffes. The giraffes were colored with copic and the background was done with colored pencils. The sun has stickles. The giraffes were from the angel company which is no longer in business. The eyelets on the side are also from the angel company but they can still be purchased from http://www.red-rubber-designs.com/juliette-hardware.html. I stamped the sun across the twill tape.

Thursday, March 21, 2013

Leaping St. Paddy Cards

It appears I haven't posted in a long time but I have been stamping just not posting so for several days I will be sharing cards.
 
Today I will share the cards I made for my son-in-law who is Italian but born on St. Patrick's Day. I made this one first.
 
 
I've had this stamp forever and don't remember who it is by. I notice a rhinestone in the corner either slipped or I put it in the wrong spot. Who knows. I'll have to fix that. The dp thatis next to the card is some pretty one I got at my lss for a song. It has a nice sheen to it.  The image is colored with copics. As soon as I got it done a free digi stamp came through on facebook and I knew it would suit my son-in-law much better so back I went and created another card.
 

The image is from mo's pencil drawings http://www.mosdigitalpencil.com/leprechaun/ . The image is no longer free though. But my son-in-law is not a sedate guy so this image was much better for him. It is colored with copics as well with a few stickles on the gold and buckles.
Here is the inside.


I had lots of fun creating these cards. I hope you enjoy looking at them.


Monday, February 18, 2013

Tildas

It has been a while since I have made a card with Tilda. Well you just can't let too much time go by without using her and I hadn't used these Tildas before so it was really time.


This Tilda is from the Christmas 2012 collection. She is colored with copics. The paper is from basic grey. The big chick is from the See Spot Save section at Target. There were 5 spring animals in a pack. I added the eye and wing with a sharpie. The flower centers are frosted lace stickles. The hearts in Tilda's lap have a pink glitter glue from the See Spot Save section. Half pearls are on the one side and little colored pearl hearts are done the side. The die cut swirl is from memory box.
Here is the inside.

I decided to try to use up some of the scraps so I made another card using the same papers but a different Tilda.

Tilda had a poinsettia in her hair but I cut that off and added this flower.
Hope you enjoyed the cards for today.

Thursday, February 14, 2013

Valentines

I made a couple of Valentines for my family.

This one uses a house mouse stamp. The paper is from Target. The fleur de lis and circles are made with nestabilities. The keys are from - oh I forget and I am too lazy to go look. lol. The mice were colored with prisma colored pencils. Some red stickles were added for berries and crystal stickles were added to the top key. I tied some organza ribbon and the a striped ribbon around the bottom. Then I put a flower over top.

Here is the next one.
The penguin is from red rubber designs and colored with copics. The border was drawn with a sharpie. A love stamp was added with a heart rhinestone. This one was for my granddaughter. One of the simplest cards I have made in a long time.
 
Hope you enjoy.

Friday, February 8, 2013

House Mouse Mug

Time to do Valentine's Day cards. Hopefully I can get the ones I need to do before Valentine's Day. I didn't get my Christmas cards done this year.

This little guy is a house mouse stamp. I did a reverse mask so I could put the decorations on the inside. That stamp is from Michaels, I think. The mug is colored with copics and the mouse is done with prisma colored pencils. I added a button for the middle. 
Here is the inside.
Pretty simple but so often I don't do anything to the inside.

Saturday, February 2, 2013

Luv

I don't usually do swaps but some on my yahoo group were asking for one so I decided to host a Valentine's Day one. I was running late so I opted to do one that didn't have any coloring. 

Really pretty simple but I had a hard time coming up with ideas on how to make it look right. The little stamp in the center came from Michael's I think (it was a gift). I got the button and papers from Target as is the ribbon. Lots of nestabilities dies used. I sewed around the paper, stapled the ribbon to the tag and assembled. The corners are a square nestabilities cut in half diagonally. 
Here is the inside.

The paper had lots of these type of little tags.
Hope you enjoyed.