Monday, February 18, 2013

Tildas

It has been a while since I have made a card with Tilda. Well you just can't let too much time go by without using her and I hadn't used these Tildas before so it was really time.


This Tilda is from the Christmas 2012 collection. She is colored with copics. The paper is from basic grey. The big chick is from the See Spot Save section at Target. There were 5 spring animals in a pack. I added the eye and wing with a sharpie. The flower centers are frosted lace stickles. The hearts in Tilda's lap have a pink glitter glue from the See Spot Save section. Half pearls are on the one side and little colored pearl hearts are done the side. The die cut swirl is from memory box.
Here is the inside.

I decided to try to use up some of the scraps so I made another card using the same papers but a different Tilda.

Tilda had a poinsettia in her hair but I cut that off and added this flower.
Hope you enjoyed the cards for today.

Thursday, February 14, 2013

Valentines

I made a couple of Valentines for my family.

This one uses a house mouse stamp. The paper is from Target. The fleur de lis and circles are made with nestabilities. The keys are from - oh I forget and I am too lazy to go look. lol. The mice were colored with prisma colored pencils. Some red stickles were added for berries and crystal stickles were added to the top key. I tied some organza ribbon and the a striped ribbon around the bottom. Then I put a flower over top.

Here is the next one.
The penguin is from red rubber designs and colored with copics. The border was drawn with a sharpie. A love stamp was added with a heart rhinestone. This one was for my granddaughter. One of the simplest cards I have made in a long time.
 
Hope you enjoy.

Friday, February 8, 2013

House Mouse Mug

Time to do Valentine's Day cards. Hopefully I can get the ones I need to do before Valentine's Day. I didn't get my Christmas cards done this year.

This little guy is a house mouse stamp. I did a reverse mask so I could put the decorations on the inside. That stamp is from Michaels, I think. The mug is colored with copics and the mouse is done with prisma colored pencils. I added a button for the middle. 
Here is the inside.
Pretty simple but so often I don't do anything to the inside.

Saturday, February 2, 2013

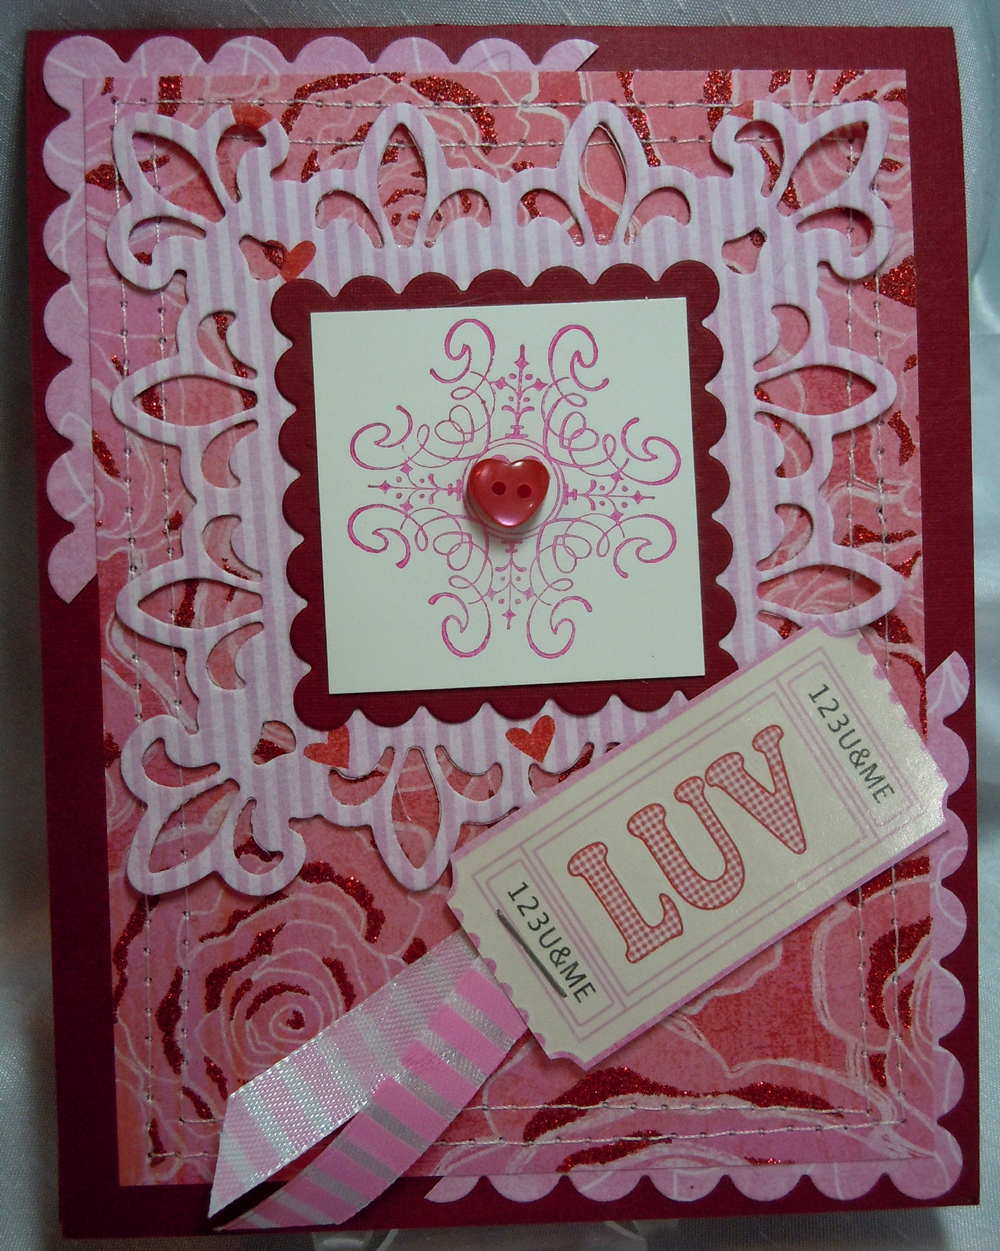
Luv

I don't usually do swaps but some on my yahoo group were asking for one so I decided to host a Valentine's Day one. I was running late so I opted to do one that didn't have any coloring. 

Really pretty simple but I had a hard time coming up with ideas on how to make it look right. The little stamp in the center came from Michael's I think (it was a gift). I got the button and papers from Target as is the ribbon. Lots of nestabilities dies used. I sewed around the paper, stapled the ribbon to the tag and assembled. The corners are a square nestabilities cut in half diagonally. 
Here is the inside.

The paper had lots of these type of little tags.
Hope you enjoyed.

Thursday, January 17, 2013

White on White

I haven't done a white on white card in quite a while when I saw a challenge to do one so off I went to my studio.

I stamped the butterfly with white Colorbox ink and embossed it with white diamond embossing powder. While the embossing powder was still warm I put more embossing powder on and heat it again. I did this a few times so the embossing powder had more depth. The die cut is from die-namics. Not sure where the embossing plate is from. 
I am going to use this card for a sympathy card for a co-worker.
I am entering it in the white challenge at flutter by Wednesday here.

Hope you enjoyed my creation.

Tuesday, January 15, 2013

Winter friends

I am on a roll. I haven't made this many cards in a row in a long time. Feels good. Love being creative.

Here is my first one. The image is from wild rose studio. The words and heart are from some old stamps that I have in my collection. The image is colored with prisma color pencils. The paper is from basic grey. The falling snow is fun flock. The stars are stickles. The die cuts have stickles added. I had to get this image because my 22 yo son loves polar bears. I am going to send him this card for Valentine's Day.

On to the next.


It is winter and I wanted to make a card for some friends and this Magnolia image seemed perfect. I like to give hugs to  my friends. Tilda and Snowy are colored with copics. The paper is from basic grey. The white snowflakes are brads from Making Memoires. The strips of snowflakes are from the basic grey collection matching the paper. I was going to put a pink bow on the card but decided it was too much pink so the aqua bow one. 

Here is the left side of the inside of the card.
The words are from Whipper Snapper and I used the mini snowy hugs for the image.

And the other side.
Hope you enjoyed my creations.

I am entering this in the sweet stamping pixies snowflake challenge here.
Thank you for the comments you make. They really mean a lot.

Monday, January 14, 2013

Bella on Bauble

Suzanne Dean went on a hunt for this stamp and when I saw it I knew I had to have it. I love elephants. It was sold out of almost every place. I finally found it in a store in Canada http://www.care2stamp.ca/site/products.php?cid=22. I was a little leery about shopping on line outside the US but they gave me great service.
Now for the cards


Both are colored with copics. The hat has diamond glaze and then fun flock on top. A little bit of stickles are underneath the diamond glaze on the bauble. On the top one I wove the gold braid through the picture so Bella was hanging on the braid. 

Thanks for stopping.

Saturday, January 12, 2013

Winter Wedding

I have to get ready to go to a wedding in a bit but thought I would share with you the card I made for the happy couple.


I used this loving couple from Magnolia and the church scene from the recent Christmas collection. The bride wanted a winter wonderland for her wedding but I am afraid the weather is not cooperating. It is quite warm today and the snow has melted but it is winter in this scene. I used snow tex and liquid pearls and white fun flock to make the snow. Everything is colored with copics and some highlights of prisma color pencils and a white pen. The snowflakes are from memory box die cuts. Tilda's dress is covered in star dust stickles. The red behind the scene is a nestabilities heart although you really can't tell. A silk ribbon and gold braid is  tied around the bottom of the card and half pearls are in the center of the snowflakes.

Here is the inside. 

The"poem" is written by me. Not that I am very good but I wish the best for them.
Hope you enjoyed the card. I do really enjoy reading your comments.


Wednesday, January 2, 2013

Polar Bear

I am in the middle of moving my studio from one room to another but needed to make a card for my son's birthday. I tried to use as many scraps as I could because I found way too many little pieces floating around.


My son loves polar bears so that is why I used this image from Rubber Stamps of America. The little blue corner stamp is from Judith. I colored the image with colored pencils and used a black copic marker for the nose. The snow was done with shaved ice from Ranger.The snowflakes are some brads I have. 

Here is the inside.

The letters are some epoxy ones I got from Target's See Spot Save section  a few years ago. 
Thank you for looking.

Monday, November 19, 2012

Tilda at the door

What inspires you to make a card. For me, this time, it was a door die cut and some hinges I have had forever.
The door is done with Tim Holtz's wood impression and Cherry Lane's door die cut. It was done is a beige cardstock and then rubbed over with brown ink to show the wood effect. Acetate is over the window of the door. I had a hard time photographing it. The wreath is stamped in green from a red rubber designs image and has red stickles on it and a gold bow. The poinsettias are from a shapebilities die cut and the holly is a memory box die cut. The inside of the flowers are yellow rhinestones. The edges are embossed with gold. I thought there was just a touch of gold ink until I added the embossing powder and then I saw how for in the ink had actually gone. 
When you open the door that is on hinges you get to see all of Tilda.

Tilda is colored with copics. I drew in the floor. There are some stickles on Tilda's dress, candle and headband.
And now for the inside.

Hope you enjoy this Tilda.